|
While the structure
of Biaxial and Quadraxial blends is the same. The difference lies
in the designing of the glazes which occupy the four corners of
the blend.
Biaxial or Quadraxial
blends are used when you may want to explore:
- changes involving
two materials in a recipe e.g. if in the Cone 10 Glaze recipe
we wanted to explore the effects resulting from changes to both
EPK Kaolin and Silica.
- changes involving
four materials in a recipe. This is the most complex of scenarios
and perhaps the least used except in the case where the materials
are colourants.
- the results
of simply blending four different recipes
Matrix offers
a number of different sized blends that can be constructed:
- 5 x 7 blend.
This is the largest that results in the generation of 35 samples
glazes.
- 4 x 5 blend
which gives 20 samples and the
- 3 x 4 blend
which gives 12 samples.
For a discussion
of the special case 5 x 7 biaxial used by Ian Currie for a blend
involving Kaolin and Silica material only go to Currie
Standard Recipe Grid
A
Biaxial Blend for Varying Al2O3 and SiO2 Sources in a Recipe
Matrix offers
the opportunity of designing blends which specifically target an
area of interest around an original recipe.
If we wanted
to fine tune a recipe such as our Cone 10 Glaze recipe by
varying the Al2O3 and SiO2 content we could design a focused biaxial
of say 20 samples in which the clay and silica material quantities
are varied.
|
Start
with the Creation of the Corner C Recipe
The process starts by designing the Corner C recipe which
will have a small reduction in the clay and silica material
content.
I have chosen Al2O3 and SiO2 levels which would place the
formula for the C recipe at the minimum suggested in the Cone
10 limits tables.
To create the corner C recipe:
- load
the original Cone 10 Glaze recipe into the R.1 recipe panel
in Recipe to Formula
- copy
the recipe into the R.2 panel and activate the panel
- open
the AlSi Graph
- reduce
the EPK Kaolin and Silica material quantities in the R.2
panel recipe until the red dot showing the Al2O3 and SiO2
formula levels for the new recipe sits approximatly at the
corner of the blue rectangle.
- convert
the new recipe to a % (totalling 100)
- save
the new recipe with a name like "Cone 10 Glaze Biaxial
C" in a Cone 10 Glaze Biaxial folder created in the
Blends folder.
|
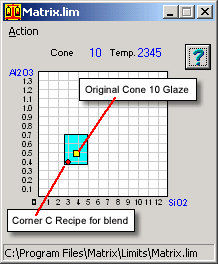 Fig.1
Corner C recipe on the AlSi Graph
Fig.1
Corner C recipe on the AlSi Graph |
Designing
the A, B, & D Corner Recipes for the "Cone 10 Glaze"
Biaxial Blend
Corner C
- is now the Cone 10 Glaze recipe with Al2O3 reduced by around
0.1 mol. and SiO2 reduced by around 0.8 mol. Oxide levels in the
flux group have not been changed
|
We can
now create the other three recipes for our biaxial corners
using the Corner C recipe as the starting point.
Corner
A - will be the Corner C recipe with about 0.2
mols. of Al2O3 added to the formula
Corner B - will be the Corner A recipe with
about 1.5 mols. of SiO2 added to the formula.
Corner
D - will be the Corner C recipe with about 1.5
mols. of SiO2 added to the formula.
|
|
Creating
the Corner A Recipe
The corner A
recipe can be created in the Recipe to Formula environment by
- placing the
new Corner C recipe in the R.1 recipe panel
- copying it
into the R.2 recipe panel using the
 button and activating the R.2 panel
- increasing
the EPK Kaolin content of the recipe until the Al2O3 mol value
in the formula increases by about 0.2
- convert the
new recipe to a % (totalling 100)
- save the
new recipe with a name like "Cone 10 Glaze Biaxial A"
in the Cone 10 Glaze Biaxial folder
Creating
the Corner D Recipe
The corner D
recipe can be created in the Recipe to Formula environment by
- placing the
new Corner C recipe in the R.1 recipe panel
- copying it
into the R.2 recipe panel and activating the R.2 panel
- increasing
Silica material content of the recipe until the SiO2 mol value
increases by about 0.2
- convert the
new recipe to a % (totalling 100)
- save the
new recipe with a name like "Cone 10 Glaze Biaxial D"
in the Cone 10 Glaze Biaxial folder
Creating
the Corner B Recipe
The corner B
recipe can be created in the Recipe to Formula environment by
- placing the
new Corner A recipe in the R.1 recipe panel
- load the
Corner D recipe into the R.2 recipe panel and activating the R.2
panel
- increasing
EPK Kaolin content of the recipe until the Al2O3 mol value increases
to the same level as the corner A recipe in the R.1 panel.
- convert the
new recipe to a % (totalling 100)
- save the
new recipe with a name like "Cone 10 Glaze Biaxial B"
in the Cone 10 Glaze Biaxial folder
|
The biaxial
blend we are creating is designed to explore the melt qualities
of the Cone 10 Glaze recipe using variations to the
levels of Al2O3 and SiO2. We achieve these variations by reducing
or increasing the clay and/or Silica material quantities in
the recipe. The original recipe and formula are shownm on
the right.
|
|
Cone
10 Glaze Original
|
|
Unity
Formula
|
| Australian
Potash Feldspar |
41.23 |
KNO
|
0.200
|
| Whiting |
28.86 |
CaO
|
0.800
|
| EPK
Kaolin |
9.03 |
Al2O3
|
0.499
|
| Silica |
20.88 |
SiO2
|
3.673
|
|
|
The formula
for the Corner C recipe which we have created (see
above) shows small reductions in the Al2O3 and SiO2 molecular
parts in the formula.
|
|
Cone
10 Glaze C
|
|
Unity
Formula
|
| Australian
Potash Feldspar |
35.59 |
KNO
|
0.200
|
| Whiting |
24.99 |
CaO
|
0.800
|
| EPK
Kaolin |
14.73 |
Al2O3
|
0.405
|
| Silica |
24.68 |
SiO2
|
2.893
|
|
| The
formula for the Corner A recipe which we have created
(see above) shows greater levels of Al2O3 and SiO2 in the formula.
The SiO2 levels have come back to near the original levels because
we increased EPK Kaolin to achieve the higher Al2O3 and this
material brought back some SiO2. |
|
Cone
10 Glaze A
|
|
Unity
Formula
|
| Australian
Potash Feldspar |
35.59 |
KNO
|
0.200
|
| Whiting |
24.99 |
CaO
|
0.800
|
| EPK
Kaolin |
35.00 |
Al2O3
|
0.646
|
| Silica |
24.68 |
SiO2
|
3.393
|
|
| The
formula for the Corner D recipe which we have created
(see above) shows greater levels of SiO2 in the formula than
the original Cone 10 Glaze. This was achieved by increasing
the Silica material quantities in the Corner C recipe. |
|
Cone
10 Glaze D
|
|
Unity
Formula
|
| Australian
Potash Feldspar |
27.31 |
KNO
|
0.200
|
| Whiting |
19.18 |
CaO
|
0.800
|
| EPK
Kaolin |
11.30 |
Al2O3
|
0.405
|
| Silica |
42.21 |
SiO2
|
4.499
|
|
| Finally
the formula for the Corner B recipe which we have created
(see above) shows greater levels of both Al2O3 and SiO2 in the
formula than the original Cone 10 Glaze. This was achieved by
increasing the EPK Kaolin material quantities in the Corner
A recipe. |
|
Cone
10 Glaze B
|
|
Unity
Formula
|
| Australian
Potash Feldspar |
27.67 |
KNO
|
0.200
|
| Whiting |
16.62 |
CaO
|
0.800
|
| EPK
Kaolin |
23.27 |
Al2O3
|
0.646
|
| Silica |
36.44 |
SiO2
|
4.990
|
|
We have now
created and stored in a special folder the four coner recipes needed
to make the biaxial blend.
Creating
the Biaxial Blend
Move to the
Blends environment and start the blend-making process by entering
the name Cone 10 Glaze Biaxial in the Blend
Name text box.
Follow the  to the
  Select the Blend Type and choose
the blend type and the number of samples for the triaxial as was
done in Making a Triaxial Blend.
Select the Blend Type and choose
the blend type and the number of samples for the triaxial as was
done in Making a Triaxial Blend.
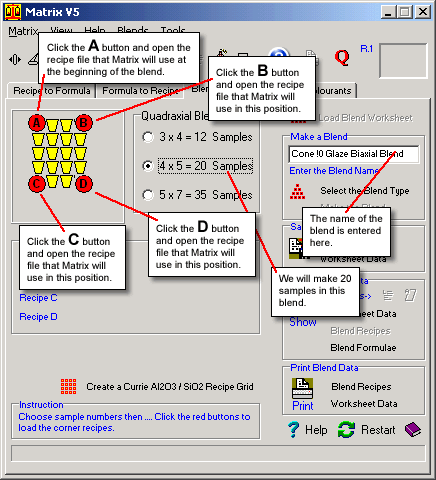
Fig.1
Enter the blend name and select the blend type |
After
making the choices of blend type and sample number (Fig.1)
we click on the red corner glaze buttons to point Matrix to
the recipes to use in creating the blend.
Matrix
is now ready to make the blend so click the Make
Blend button.
Information
regarding the blend can now be viewed before saving the worksheet
and the recipes.
e.g. you
might want to check the range of samples on a graph incase
it needs to be increased or reduced.
Fi.g 2
shows the range of Al2O3 and SiO2 molecular parts represented
in each of the recipes in the blend.
|
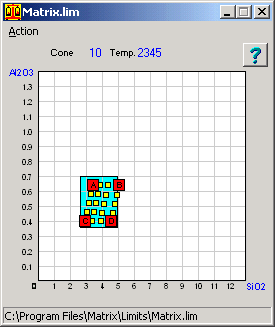
Fig.2
The Briaxial blend mapped on the Al:Si graph |
The A,
B and C and D recipes are located on the graph (Fig.2) and
the samples generated by Matrix for the biaxial are distributed
betweeen these corners.
The blue
limits rectangle for C.10 in the background shows how the
blend recipes we have designed and created relate to the recommended
range for C.10
The blend
worksheet and recipes may now be saved using the buttons in
the Save the Blend panel. More
...
You will
also want to print out the worksheet data so that you can
mix the blend. You may also want to obtain a printout of the
blend's recipes and formulae using buttons in the Print
Blend Data panel.
|
Physically
Making the Blend
To physically
making the blend you will need to print the worksheet data.
Click the
Worksheet Data button in the Print Blend Data
panel to get the printout you need. You can take this printout to
your glaze mixing lab and prepare the blend recipes and test tiles
for firing.
Assessing
the Blend After Firing
After you have
fired the blend you will want to refer to the individual recipes
representing the glazes on the test tiles.
Click the
Blend Recipes button in the Print Blend Data
panel to get the printout which includes all recipes and their unity
formulae.
Follow
these links for more information about:
|

