|
The Currie Standard
Recipe Grid is a 5 x 7 biaxial blend constructed under certain strict
guidelines. This biaxial blend has been promoted by Ian Currie as
a method for the systematic study of glazes firstly in his book
"Stoneware Glazes - A Systematic Approach" (Bootstrap
Press) and more recently in "Revealing Glazes - Using the Grid
Method" (Bootstrap Press). You
can learn more about this approach at Ian's web site http://ian.currie.to/index.html
The usefulness
of this approach to the study of glazes is well recognised and Matrix
provides a facility for the generation of such a blend as an addition
to its custom blend creation processes.
What
is a Currie Standard Recipe Grid
|
The Standard
Recipe Grid is a 5 x 7 biaxial blend in which kaolin and silica
materials are used to vary the Al2O3 and SiO2 content across
the 35 recipes in the blend.
The grid
is essentially a series of line blends in which silica material
is increased horizontally and kaolin is increased vertically.
The grid
is based on a particular recipe and is designed to generate
a range of different quality melts. Each recipe in the blend
has the same flux content. Differences in the quality of the
fired glazes results from variation in Al2O3 (vertically)
and SiO2 (horizontally) only.
|
 |
Under Ian Currie's
guidlines the Standard Recipe Grid uses only kaolin as a source
of additional Al2O3 and silica material as a source of SiO2. This
enables easier comparison of one grid with another in which case
the different flux groups would be responsible for differences in
the melts across the grid.
How
a Standard Recipe Grid is Constructed
A Standard Recipe
Grid is based on a particular recipe from which four corner recipes
are created starting first with the Corner C.
| Corner
C |
Created
by removing all non-flux source materials from the original
recipe and converting the quantities to total 100. |
| Corner
A |
Created
by taking 60% of each Corner C recipe quantity and adding 40%
kaolin to the recipe. |
| Corner
D |
Created
by taking 50% of each Corner C recipe quantity and adding 50%
silica material to the recipe. |
| Corner
B |
Created
by taking 30% of each Corner C recipe quantity and adding 25%
kaolin and 40% silica material to the recipe. |
The blend is
then generated within these corner recipe parameters.
How
to Generate a Standard Recipe Grid Using Matrix
The first step
is the selection of the recipe on which to base the grid. We can
use the Cone 10 Glaze recipe as an example.
From the Recipe
to Formula environment click on the the Blends
tab.
Next click the
 Create
a Currie Standard Al2O3 / SiO2 Recipe Grid button. This
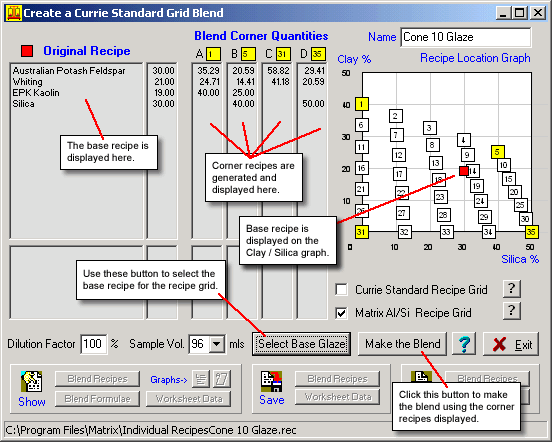
opens the window shown in Fig.1. Create
a Currie Standard Al2O3 / SiO2 Recipe Grid button. This
opens the window shown in Fig.1.

Fig.1
Creating a Currie Standard Recipe Grid. |
Selecting
the Base Recipe
Standard recipe
grids are generated from a particular recipe which you must have
already saved as an individual file. The creation of the grid commences
with the selection of the base recipe.
Click the Select
Base Glaze button and choose the recipe from the Individual
Recipes folder.
Matrix immediately
generates the corner recipes and they are displayed together with
the base recipe.
The base recipe
is also displayed on a graph which locates its position in relation
to all of the other recipes which will be generated when the Make
the Blend button is clicked. The graph shows the % of clay and
silica material in each of the recipes in the grid. This graph is
useful if you wish to design a blend which has a different range
than the full Standard Recipe Grid created in this process.
Selecting
the Type of Recipe Grid
 Matrix
offers two types of recipe grid. The Currie Standard Recipe Grid
requires the inclusion of a china clay (kaolin) in the recipe. The
Matrix Al/Si Recipe Grid will allow any clay to be used. Matrix
offers two types of recipe grid. The Currie Standard Recipe Grid
requires the inclusion of a china clay (kaolin) in the recipe. The
Matrix Al/Si Recipe Grid will allow any clay to be used.
- Matrix
Al/Si Recipe Grid.
This is the
default setting. If there is a clay already in the base recipe
then with this setting Matrix accepts that clay for generating
- Currie
Standard Recipe Grid
With this selection Matrix ignores the presence of a clay
and silica in the recipe and will ask you to choose a china clay
and silica material for inclusion in the blend.
Making
the Blend

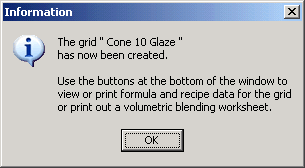
Fig.2
Confirmation that the recipe grid has been created. |
When the
base recipe has been selected click the Make
the Blend button.
Matrix
generates the blend and then displays the information window
shown in Fig.2
After
clicking the OK button all of the buttons in the Recipe Grid
window become active. The buttons perform the same functions
as those in the Blends environment.
|
Checking
the Individual Recipes in the Recipe Grid
After the Make
the Blend button has been clicked the sample recipes in the full
grid have been generated. You can view any of the generated recipes
by clicking on a sample number on the Recipe Location Graph.
Checking
the Al2O3 and SiO2 Range in the Recipe Grid

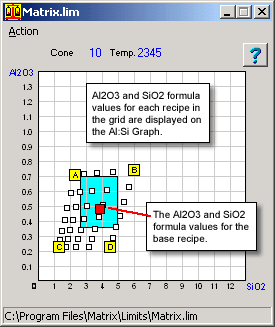
Fig.3
The recipe grid dislayed on an Al:Si graph |
Click
the  button to open the Al:Si Graph (Fig.3)
While
the graph shown in Fig.1 focuses on material quantity %'s
in the recipe grid the Al:Si Graph displays the grid Al2O3
and SiO2 formula values.
The blue
rectangle shows limit values for the current temperature setting
in the Recipe to Formula environment.
The red
square locates the base recipe Al2O3 and SiO2 formula values.
|
Base
Recipes that have No Clay or Silica
Sometimes you
may wish to generate a recipe grid from a recipe that has no clay
and/or silica materials included. In such cases Matrix informs you
that a clay and/or silica is need to to enable the generation of
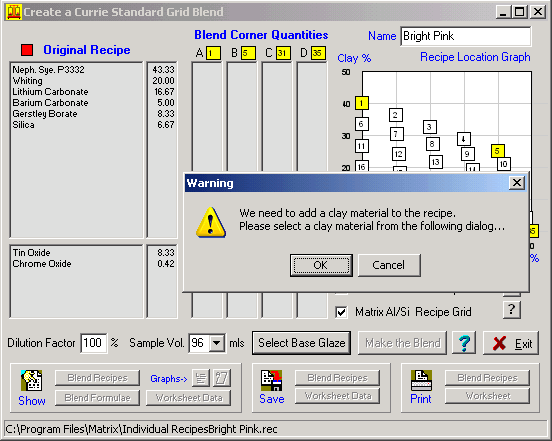
the recipe grid.(Fig.4)

Fig.4
Matrix reacts to a base recipe which contains no clay or no
silica. |
Fig.4 Shows
a recipe selected which has no clay. When you click the OK
button in the Warning Dialog the Material Selection window
opens for you to choose the kaolin you wish to have included in
the recipe grid. A similar event occurs if there is no silica material
in the base recipe.
Changing
the Sample Volumes
The default
setting for Matrix Recipe Grid blends is the generation of sample
recipes made up to a volume of 96 mls. In some cases you may wish
to generate samples with smaller volumes e.g. if the materials in
the blend are very expensive.
Matrix will
generate a blend with volumes of either 96 mls or 48 mls. You can
select the 48 mls option by selecting from the Sample
Vol. menu before clicking the Make
the Blend button.
Changing
the Dillution Factor
Occasionally
the base recipe you are working with may generate a recipe grid
which is very thick in its consistency making it difficult (particularly
in the Corner A and B recipes) to physically dispense the blend
samples using the volumetric approach.
Matrix will
generate a blend with in which the recipes are thinner in consistency.
The Dillution Factor text box
allows you to enter values which will generate thinner samples.
The default setting is 100% If you wanted samples that are half
as thick you could enter make the Dillution Factor 50%.
Saving
the Recipe Grid Worksheet and Recipes
The recipe grid
worksheet and recipes may now be saved using the buttons in the
Save panel. More
...
Printing
the Recipe Grid Worksheet and Recipes
You will also
want to print out the worksheet data so that you can mix the blend.
You may also want to obtain a printout of the recipe grid recipes
and formulae using buttons in the Print panel.
Physically
Making the Blend
To physically
making the blend you will need to print the worksheet data.
Click the
Worksheet Data button in the Print panel to
get the printout you need. You can take this printout to your glaze
mixing lab and prepare the grid recipes and test tiles for firing.
Assessing
the Blend After Firing
After you have
fired the blend you will want to refer to the individual recipes
representing the glazes on the test tiles.
Click the
Blend Recipes button in the Print panel to
get the printout which includes all recipes and their unity formulae.
Follow
these links for more information about:
|

