|
Line blends are
used when you may want to explore
- changes involving
a single material in a recipe e.g. if in the Cone 10 Glaze recipe
we wanted to explore the effects resulting from changes to just
EPK Kaolin.
- the variations
in colour from the addition of a single colourant.
- the results
of blending two different recipes. e.g the B recipe in the blend
may be designed to have less Al2O3 an SiO2 than the A recipe such
that the Al:Si ratio is kept constant
We will use
the last case above as an example. We have already designed this
glaze
Designing
the Corner Recipes for the Line Blend
|
We will
need to have three recipes for the corners of the triaxial
blend..
Corner
A - will be the original Cone 10 Glaze recipe
Corner B - will be the Cone 10 Glaze altered
to reduce Al2O3 and SiO2 levels maintaining the Al:Si ratio
|
|
The following
recipes were prepared in the Recipe to Formula environment. After
making the reductions indicated above the recipes were converted
to total 100. Note that the recipe names include the letter which
indicates in which corner the recipe will be place.
All three recipes
were saved to the following location: C:/Prgram Files/Matrix/Blends/Cone
10 Line/.
The Cone
10 Line folder was created in the Blends folder to hold all of the
line blend files.
|
Cone
10 Glaze Line A
|
|
| Australian
Potash Feldspar |
30
|
| Whiting |
21
|
| EPK
Kaolin |
19
|
| Silica |
30
|
|
|
Cone
10 Glaze Line B
|
|
| Australian
Potash Feldspar |
41.23
|
| Whiting |
28.86
|
| EPK
Kaolin |
9.03
|
| Silica |
20.88
|
|
Creating
the Blend
Move to the
Blends environment and start the blend-making process by entering
the name Cone 10 Glaze Line in the Blend
Name text box. Note that the  moves down to the Select the Blend Type
button indicating that clicking this button should be your next
action..
moves down to the Select the Blend Type
button indicating that clicking this button should be your next
action..
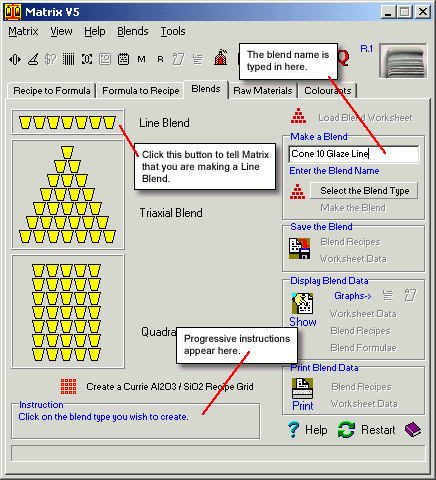
Fig.1
Enter the blend name and select the blend type |
After
clicking the Select the Blend Type
button the display shown in Fig.1 appears.
The three
types of blends are shown.
Click
on the type of blend you wish to create.
The display
changes to that shown in Fig.2
|
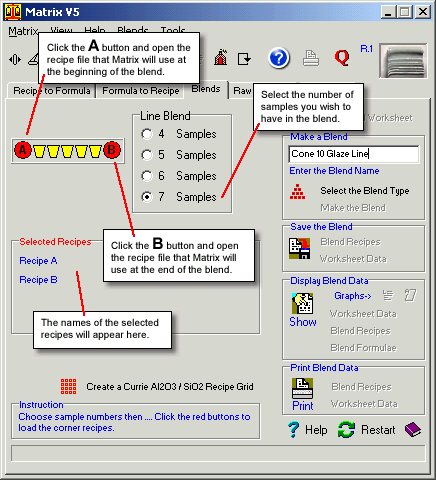
Fig.2
Selecting sample numbers and A & B recipes for the line
blend |
After
selecting the blend type the display changes offering further
choices for information that Matrix needs to create the blend.
Selecting
Sample Number
For each
blend you can choose the size of the blend. Line blends can
be created in four sizes.
Selecting
Corner Recipes
Matrix
needs to know which recipes you will use for the "corners"
of the blend. For a line blend you need to point to two recipes.
When one
of the red buttons is clicked the Windows File Selection dialog
opens. You must navigate to the location of the recipe you
wish to use and double click on its name.
|
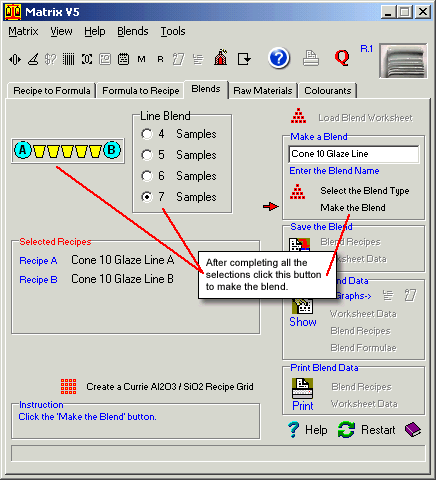
Fig.3
Matrix is ready to create the blend - click the Make
Blend button |
When you
have made the sample numbers and corner recipes selections
Matrix has all the information it needs to create the blend.
The  moves down to the Make the Blend
button which you can now click to generate the line blend.
(Fig.3)
moves down to the Make the Blend
button which you can now click to generate the line blend.
(Fig.3)
|
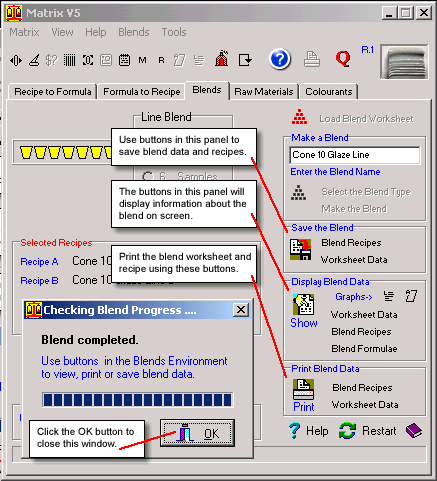
Fig.4
The Line Blend has been created. Data can be viewed and printed. |
After
clicking the Make the Blend
button the Checking Blends Progress window opens to
indicate when the blend has been created. (Fig.4)
Click
the OK button to close
the Checking Blends Progress window.
You may
now save the blend worksheet and recipe in the folder that
you created for this blend.
The Display
Blend Data panel offers buttons which will open
windows containing blend information. More
...
The  button will open an enlarged Limits Graph with the formulae
for all of the individual blend recipes displayed.
button will open an enlarged Limits Graph with the formulae
for all of the individual blend recipes displayed.
The  button
will open an enlarged Al:Si Graph which
displays the Al2O3 and SiO2 limits for the temperature set
in the Recipe to Formula environment. button
will open an enlarged Al:Si Graph which
displays the Al2O3 and SiO2 limits for the temperature set
in the Recipe to Formula environment.
|
The blend worksheet
and recipes may now be saved using the buttons in the Save the
Blend panel. More
...
You will also
want to print out the worksheet data so that you can mix the blend
mand you may want to obtain a printout of the blend's recipes and
formulae using buttons in the Print Blend Data panel.
Physically
Making the Blend
To physically
making the blend you will need to print the worksheet data.
Click the
Worksheet Data button in the Print Blend Data
panel to get the printout you need. You can take this printout to
your glaze mixing lab and prepare the blend recipes and test tiles
for firing.
Assessing
the Blend After Firing
After you have
fired the blend you will want to refer to the individual recipes
representing the glazes on the test tiles.
Click the
Blend Recipes button in the Print Blend Data
panel to get the printout which includes all recipes and their unity
formulae.
Follow
these links for more information about:
|
