|
|
|
| Lesson 1 | ||||||||||||||||||||||||||||||||||||||||||||||||||||||
Glaze Recipes - Their Application and Firing.
The first lesson focuses on the fundamental nature of a ceramic glaze and invites you to commence experimenting with the raw materials which are used to make glaze recipes. We will be discussing the mixing and firing of a glaze. You will also commence the task of locating and recording as many recipes as you can for testing during the first semester. These recipes should reflect the temperature and quality that is of interest to you and that you are able to fire in your workshop or your group's workshop. This body of glazes will build over time into a library of tested glazes of different types giving you a variety of options for finishing your clay forms. In the earlier stages of this course the focus will be on high fired glazes, not because they are better than low fired glazes, but because the chemistry of high fired glazes is simpler. These glazes can demonstrate the basic principles of glaze chemistry more easily. Although you will be most interested at this stage in glazes that fire at temperatures you may have used in the past, if you are able to fire the high temperature glaze examples used in the earlier stages of this course that would be beneficial. The following list of concepts are discussed in detail in the Lesson Notes below. Click on the first word of each concept to goto to the lecture note.
Summary of Activities This summary outlines the practical exercises associated with this week's lesson. They are described more fully in the Activities section below.
Equipment and materials required.
Please study the following notes and suppliment the information with
readings from your books, magazines and internet resources. Feel free
to email lawrenceewing8@gmail.com
if
you need further explanation or wish to make comment.
Essentially glaze is a form of glass - a very viscous form of glass which is usually fused to a clay body. The essential component of fired glaze is usually silica (SiO2) which, with the aid of other components, can be made to melt to a viscous (sticky) state at temperatures lower than it's individual melting point which is (1710 deg.C).
The chemical component necessary to produce a glaze may be found in various combinations of raw materials some of which are mined from the earth's surface (minerals) and others which may have been produced through industrial processes. Purchased raw materials are ground down to fine particles so that they will mix easily during preparation and will fuse easily during firing.
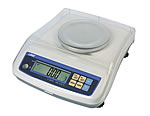
To make a glaze recipe carefully chosen materials are weighed out in strict proportions and added to sufficient water to enable the mixture to be passed 2 or 3 times through a sieve. More water is then added (or removed) to give the glaze mixture a creamy consistency. Other organic mediums can be used such as oil which will burn out early in the firing leaving the glaze particles to fuse into glass. The initial testing of a glaze can be achieved by mixing a small test sample of say 100grms dry weight which will make up about 100mls of glaze liquid sufficient for dipping a clay test tile of about 3cm x 4cm. The thickness (creaminess) of the suspended glazes is an important factor when applying a glaze. Usually the amount of clay powder (kaolin, ball clay, or bentonite) determine the thickness of the glaze.
The chemicals required for the glaze melt are contained in the powdered materials suspended in the water medium. Before applying (dipping, brushing, spraying, etc) the glaze the liquid should be thoroughly stirred to ensure even distribution of the various raw material powders. In studio potteries glazes are usually applied to clay forms that have been "bisque" fired. In this process the clay form is fired to a temperature sufficient to drive off the "molecular" water thus leaving a porous ceramic form that will not deform when dipped in water. Forms are bisque fired to temperatures somewhere between 600 and 1000 deg.C. The process of bisque firing makes glaze application easier and safer as any water involved does not weaken the form. Some potters prefer to "raw glaze" their forms. They apply the glaze to the dried clay form then fire up to the temperature required to melt the glaze. When the glaze is applied or the form is dipped, the porous clay body absorbs the water leaving a skin of powder adhered to the surface of the clay. In dipping the thickeness of powder left on the surface of the form is dependant on the length of time the object is immersed in the liquid glaze and the porosity of the clay.. Test firing will determine the best thickness to aim for when using a glaze. This could be anything up to 2mm or more in thickness depending on the nature of the melt required. When dipping a test tile you can quickly dip the tile in and out then dip half of the surface again into the glaze to achieve a thicker layer. Sometimes the skin of powder is dense and well bonded to the clay surface after application making handling of the glazed form without disturbing the glaze powder easy while other times the unfired glaze is very powdery and vulnerable. In such cases the thin glaze layer can be easily damaged with careless handling.
The clay body may also be partially melted sufficient to reduce its porosity (in the case of higher fired forms). In such case the the form may be rendered waterproof. This melting of both clay and glaze results in the fusing of the two together. The term "vitrification" is used to refer to the degree of fusion achieved in the firing of the clay form. Glass is usually fully vitrified. The temperature required to melt a skin of glaze is determined by the design of the recipe and the balance of its constituent parts. It is important to note that temperature alone will not melt a glaze unless it is subjected to that temperature for sufficient time. This function of temperature over time is called work heat. If your temperature is high enough the glaze will melt in less time or conversly a lower temperature achieved in the kiln will require a longer time for the glaze to melt.
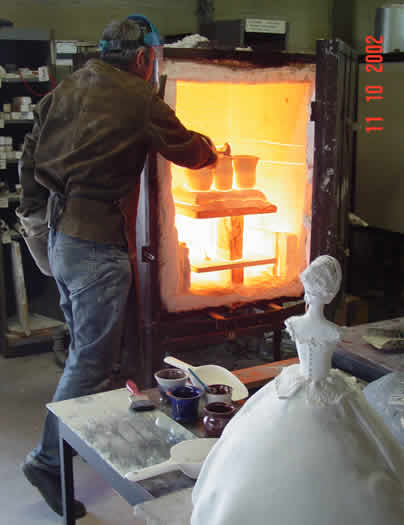
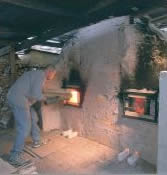
While there are visual and instrumental ways to gauge the work/heat achieved in a kiln firing, the most common and perhaps the most efficient method is to use a pyrometric cone. Pyrometric cones or "cones" for short, are small "sticks" of ceramic materials the composition of which is designed to soften within a specific work/heat range. The cone is designed to stand upright on a slight angle supported in a mound of clay (some cones are self supporting). As the kiln approaches the desired work/heat range the cone begins to soften and bends over in a curve to "touch its toes". At this point the desired work/heat has been achieved in that region of the kiln. Cones measure the work/heat that the ceramic materials in the kiln are subjected to. They are placed in the kiln during packing where the softening process may be observed through a spyhole during firing. It is important to remember that the work/heat achived in kilns used in studio potteries can vary from one part of the kiln to another. Cones will only acurately measure the work/heat where they are situated. Sometimes, depending on its design and how it is fired, a kiln may vary as much as two cones particularly from top to bottom.
Later in this course you will learn about the chemical changes which take place in the melting glaze during firing. Because the atmosphere of the kiln includes gases such as oxygen and carbon dioxide this atmosphere can influence the chemical changes which occur to the glaze during heating. In a well ventilated kiln heated with electricity or in a gas or solid fuel kiln that is very clean burning (no smoke) the clay forms are surrounded by the same gases which are present in our atmosphere the most important of which as far as glaze chemistry is concerned is oxygen. In a kiln heated with burning gas such as LPG, or with solid fuels such as wood or other combustible organic material, it is possible to create an envelope of gas around the pots which can be rich in carbon (smoke), carbon dioxide or carbon monoxide. The forms can be starved of oxygen and the hot carbonaceous gases can "steal" oxygen from the clay and glaze chemicals. Such an atmosphere can cause marked changes in the chemistry of the melting glazes resulting in different qualities than those produced in kilns with an excess of oxygen available. A kiln with plenty of oxygen available in its firing atmosphere is said to be firing in oxidation as opposed to the reverse case where the kiln atmosphere is starved of oxygen. A kiln in which the atmosphere is starved of oxygen but rich in carbonaceous gases and particles is said to be firing in reduction. You will learn more about the chemistry of these effects later in this course.
While the chemistry of a glaze is very important, the quality of the fired glaze is dependent on many other physical factors. For this reason the full potential of a particular recipe can only be appreciated by repeated firings in which these non-chemical factors are varied. Many potters find that they can achieve widely varying results from the same recipe by varying these factors. They prefer to use a small number of glazes achievng variety through changes in application and firing.
It all comes down to the amount of glass that is created in the clay and in the glaze. All ceramic materials essentially consist of a selection of the same oxides in various combinations and proportions. Clay contains similar flux, stabiliser and glass-forming oxides as might be found in a glaze. In a clay however the flux content is much lower than it is in glaze. During firing some of the silica in a clay body begins to melt but much less than the silica content in a glaze. Thus the clay body begins to vitrify without losing its form unless it is over-fired which of course increases the amount of silica which melts.
Health and safety are important considerations in the handling of glaze materials and in the firing of glazes. Indeed such considerations extend beyond the fired glaze as some glazes present a danger to health in their use on functional domestic-ware forms. All fine powders which can float in the atmosphere represent a risk to health as the particles can be breathed into the lungs. This is a serious consideration as in most cases the floating particles may be too small to detect with the naked eye. A well known degenerative disease amongst clay miners throughout history is silicosis which is brought on by the accumulation of silica or clay dust in the lungs. For more information about this important health hazard go to http://www.who.int/inf-fs/en/fact238.html Handling some of the materials used in making glazes may expose you to risks from ingestion (swallowing), or irritation to the skin or eyes through direct contact. The following ingredients can present a health risk:
The following advice is offered to assist you with avoiding problems related to the handling and firing of glaze materials:
Some glaze materials used in badly designed glazes may leach out of the fired glaze where the pot is used for containing acidic liquids such as coffee, fruit juice, wines, etc. Glazes used inside pots used for cooking or dispensing food or drink should be food-safe i.e. the glazes must be designed so that after firing no toxic materials will be released into the food or drink. The issues associated with the creation of food-safe glazes will be addressed later in this course.
These bowls need only be about 6cm in diameter and about 3cm deep. The bowls should ideally be bisque fired (to 1000 deg.C in the case of stoneware body clay). You will need about one and a half times as many bowls as you have raw materials to test fire. 2. Test fire to as high a temperature as possible (no higher than cone 10, 1300 deg.C) individual samples of as many raw materials as you can. Clearly mark each bowl with a code which will identify the material you intend to place in it. This can be done with a thin paintbox childrens paint brush. Use a mixture of red iron oxide and water to paint on the code on the outside of the bowl. Place each sample of raw material in a seperate bowl. You will only need a very small amount. Some of which may be spread over the surface of the inside of the bowl with the remainder clumped together into a very small pile. If you do not have the facility to fire to cone 10 then fire as high as is practical. e.g. you may be able to fire your electric kiln to cone 8. 3. Evaluate the fired tests. Look carefully at each each fired bowl to see if any melting has happened. See if you can say why some materials melted more than others. Look at places where the material was thin and touching the clay. Was there more melting there than where the material did not come into contact with the clay of the bowl (e.g. where it was "piled")? Take a good close-up photo of each fired bowl and record your observations about the material. NOTE: This exercise can be done in groups to share the work load. It is often beneficial to observe and discuss the results with others in a group situation. Your notes and observations, however should be your own and should be recorded in your workbook. 4. Make a bucket full of glaze test tiles and bisque fire them for use in testing glazes.
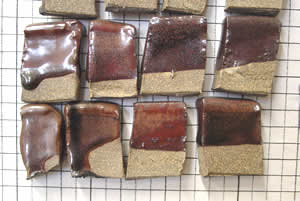
5. Locate glaze recipes that interest you, mix and sieve them, then apply them to test tiles for firing. Now you must put a lot of effort into collecting glaze recipes from wherever you can for test firing. If you are a member of a group then you can share the location and test firing of recipes and you can share the fired results. The best sources are ceramic magazines such as Ceramics Monthly (USA), Ceramics Review (UK), Pottery in Australia, Ceramics Technical (AUS), books on pottery making, the Internet - use search engines (Google) to locate glazes.
Many of the glazes you locate will have materials which you are unable to get in your area. Later in the course you will learn how to replace those materials with local materials without seriously disturbing the fired quality of the glaze. In the meantime materials such as feldspars and clays will need to simply be relaced with any available feldspar or clay in the hope that a reasonable quality will result. This hit and miss shotgun approach will do for now to enable you to build up a base collection of glazes to work with. If you do not have the facilities to fire to C.10 then collect glazes to fire at whatever cone is practical. Make sure that you record the recipes correctly and that your labelling system enables you to match the recipe in your records with the fired sample which may end up on a wire or glued to a board. If you have a digital camera (almost a necessity for this course) you may like to use it to document your glazes.
Remember to keep records of your research and your glaze testing. If you intend stringing you glaze tests on wire or a string then you must drill a hole in each tile before bisque firing. If you wish me to comment on the work that you are doing then you develop you records digitally i.e. writing a document in a word processor such as Microsoft Word. These documents, which can include images) may be attached to emails and sent to me. Where possible I will endeavour to comment on your findings and return the digital document to you via email.
This website contains a section that allows you to post questions or comments that can be seen by myself and other students who may like to answer your questions or comment on your thoughts. This forum, which also allows you to include images with your comments, is an important means of communication and sharing of ideas. Click here to check out the "Forum".
If you have any questions . . . . . Email. . . .lawrenceewing8@gmail.com |
||||||||||||||||||||||||||||||||||||||||||||||||||||||
|
|
Contact: Lawrence Ewing - 1015 Ellis Rd, Five Rivers, RD3, Lumsden, Northern Southland,
New Zealand |
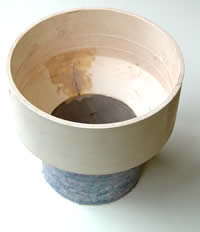
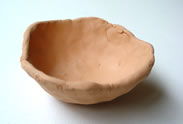 1. Make
a series of small shallow bowls for test firing raw materials.
1. Make
a series of small shallow bowls for test firing raw materials.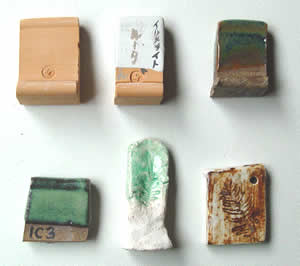 There
are many different ways to produce test tiles. No matter what design you
use the essential needs are:
There
are many different ways to produce test tiles. No matter what design you
use the essential needs are: